⬑ Go to: Main
Go to next: In Depth Controller Guide ⟾

1.Thank You!
The following guide is a series of step-by-step tutorials that are easy to follow and will quickly teach you everything you need to know.
Once you’ve had a chance to explore VariaBULLET2D, please take a moment to leave a review on the the asset store. Reviews are extremely important. It helps us continue developing and supporting the asset, as well as create future assets.
And if you have particular questions or concerns, don’t hesitate to reach out!
2.Download and Install
After purchasing VariaBULLET2D from the unity asset store you will be able to download and import the entire package into a Unity project.
The asset package is supported by Unity versions 5.4.2 and later. A conversion will run to update it for compatibility with later versions.
Before importing VariaBULLET2D, it’s highly recommended that you start with a fresh project to best access the included demo scenes and better understand the toolset in a “sandbox” environment.
The underlying collision and bullet management system in particular depends on setup of reserved tags/sorting/physics layers which are normally set at the project level. These must be initiated by the end user and there are, both, automatic and manual setups for this detailed in the collision system guide.
Once you have that set up, return to this Quick Start Guide in order to quickly get up to speed on using VariaBULLET2D.
The video at the link below is a visual companion piece to the Quick Start Guide, and goes through many of the steps present in the guide:
youtu.be/INAL4-myBWo
Quick tip: hover over fields in most scripts to get a Tooltip hint popup.
3.Adding Controllers
All projectiles in VariaBULLET2D start with setting a Controller, which is, in its entirety, a collection of structured prefab gameobjects and their attached scripts.
Note: As of v1.06, you can now add controllers by right-clicking a GameObject, or anywhere in the hierarchy pane, and selecting VariaBULLET2D > Controller or from the top menu GameObject > VariaBULLET2D > Controller.
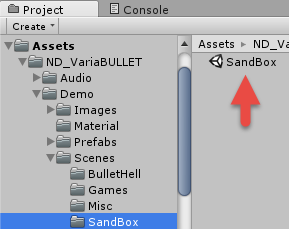
Setting a new Controller is very easy to do. Start by navigating to the project directory Assets > ND_VariaBULLET > Demo > Scenes > SandBox and loading the test scene called SandBox.
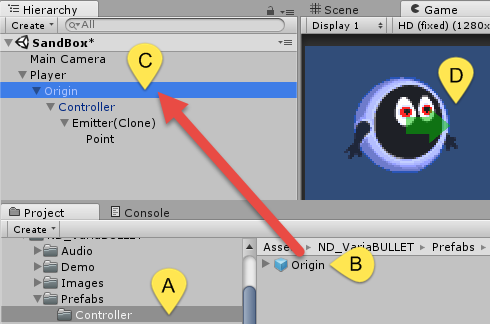
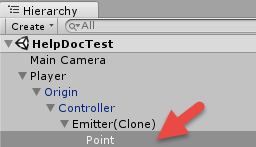
Under the gameobject labeled “Player” is a Controller which has already been attached, beginning with the top-most gameobject called Origin.
Right-click the Origin gameobject and select “delete” so we can start the process from scratch. Next, [A] navigate to the project directory Assets > ND_VariaBULLET > Prefabs > Controller
Select the [B] prefab here called Origin and [C] drag it to the “Player” gameobject in the Hierarchy.
You’ll notice a [D] green arrow pops up close to your “Player” gameobject. This indicates that the Controller instantiated a single Point emitter by default.
4.Setting Emitters & Controls
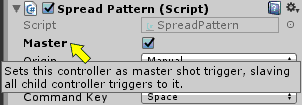
A Controller’s main role is to set and control emitter Point positions. The heart of this functionality is contained in the Controller gameobject’s attached SpreadPattern script which allows real-time editing directly in the inspector whether in edit mode or in play mode.
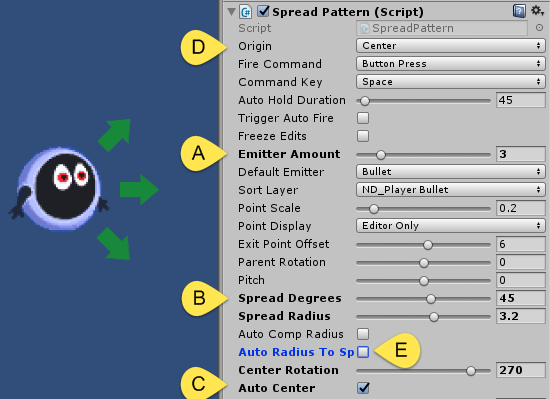
To add more emitters, go to the attached SpreadPattern script and simply drag the Emitter Amount slider to the amount you wish to create. Here we [A] set it to 3 emitters.
You will only see a single emitter because they are all over top of one another. To separate the emitters you can turn to a variety of the other controls. For now, simply increase the Spread Degrees value. Here they are set to [B] 45 degrees of separation.
Notice how the emitters change their relative placement in a 360 degree arc the more you increase the Spread Degrees value. To keep the emitters facing in a single direction, [C] enable the Auto Center control. Now when you increase the Spread Degrees they will remain anchored in single direction relative to a center point.
By default the center point is set to the middle relative to the upper-most parent gameobject, noted as “Player” here.
If the parent has a SpriteRenderer and Sprite attached, you can automatically set it to the right Tip or Center of this sprite. Otherwise, by setting to Manual you can change the center point by placing the Origin gameobject wherever you want by directly changing its Transform. For now [D] set it to Center.
Next, we’ll turn to the Spread Radius control which is typically used to increase the radius of the emitter arc.
Once again, if you have a Sprite attached to the parent, you can automatically set the radius to that of the Sprite by activating [E] AutoRadius to Sprite.
This is particularly useful when you want a set of emitters to arc nicely around the circumference of the parent Sprite.
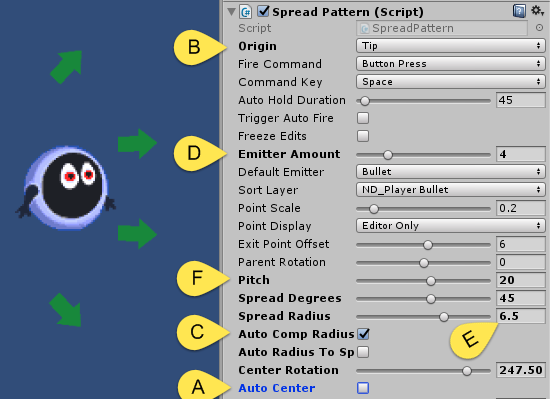
[A] Disable Auto Center and move the slider for Center Rotation to see this effect (Center Rotation is not accessible while Auto Center is enabled when in Radial mode).
To see the usefulness of the Auto Comp Radius setting, change the [B] Origin to Tip and then enable the [C] Auto Comp Radius.
[D] Increase the Emitter Amount to 4 and then [E] increase the Spread Radius to 6.5 and notice how the arc anchors to the very tip of the parent Sprite despite the increase in radius. This is particularly useful when the parent is a typical firing object like a space ship or gun with a visible exit point; keeping emitters anchored close to the exit point even if you change the Center Rotation or Spread Radius.
While here, [F] change the Pitch control to 20 to see how it modifies the emitter angles across 360 degrees of tilt.
5.Radial vs Stack Patterns
The default Pattern Select orientation is set to Radial, however you can change it to Stack which can function similarly but is generally better for creating parallel rather than arcing emitter patterns.
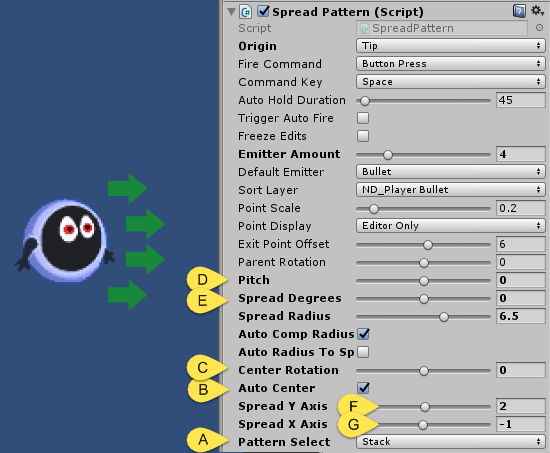
[A] Change Pattern Select to Stack and notice it changes the placement of the entire pattern. This is because the way Auto Center works with a Stack is different from Radial. For a Stack pattern, you can simultaneously control Center Rotation while Auto Center is enabled. In this scenario, rotational centering is done by setting Center Rotation to 0, while Auto Center ensures the pattern is vertically anchored relative to the center point.
Go ahead and [B] enable Auto Center and [C] set Center Rotation to 0.
Another key difference between a Stack and Radial pattern is how they utilize the Spread X/Y Axis controls. Set the [D] Pitch to 0, [E] Spread Degrees to 0 and increase the [F] Spread Y Axis slider to 2. Notice how it creates a stack formation. Create a “V” formation by [G] decreasing the Spread X Axis slider to -1.
Change back to a Radial pattern and notice that the Spread Y Axis and Spread X Axis values have changed the placement of the relative center point. In Radial mode this is the normal function of these sliders.
Experiment with changing the Spread Degrees value to see how this can create a “wobble-like” motion while modifying Spread Y Axis and Spread X Axis values change the area of the effect.
6.Firing Shots
Once you have your emitters set up, the next thing you’ll want to establish is the shot characteristics for each emitter, such as speed, rate, shot type and so on. This is handled by the firing script attached to each Point gameobject set as a child gameobject to each Emitter.
The firing script for each child Point can be either a FireBullet script (for bullets) or FireExpanding script (for lasers). The default script for each emitter is FireBullet, which can fire any kind of Bullet shot prefab.
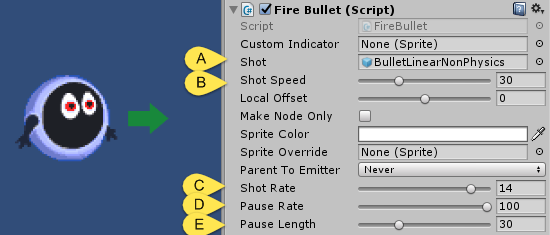
For now, just make note of the [A] default shot prefab called BulletLinearNonPhysics set in the Shot slot. Go ahead and press the play button to run the scene and press the spacebar to instantiate this shot from its emitter. Also note how the shot is different depending on whether spacebar is tapped or held.
While in play mode, change the [B] ShotSpeed from the default 30 to 60 and hold the spacebar to fire the shots. Note how the bullets increase in speed but are now spaced out farther from each other.
You can decrease the spacing internal by moving the [C] Shot Rate slider up to a low value. Set it to 4. Now press spacebar and note how the shots occur at at faster rate.
Turning now to the [D] Pause Rate, set it to 40 and press spacebar to observe a pause interval appear in the shot stream. Pause Rate sets how often the pause occurs, while Pause Length adjusts the length of time each pause lasts.
To create a shorter pause gap, move the [E] Pause Length slider down to 5. Make note of all of the values you’ve changed and exit play mode. You’ll notice that the values are reset to the state previous to enabling play mode. Play mode is therefore a good way to non-destructively experiment with creating shot patterns, but be sure to remember the values you settled upon so that you can input them once back in edit mode.
Actual triggering of the shot is the responsibility of the controller script, which notifies each of its Emitter’s firing scripts when to fire based on the command type chosen.
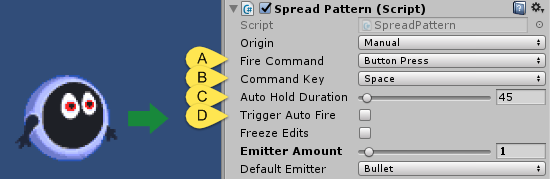
Turn back now to the Controller gameobject parent to this emitter and look at its attached SpreadPattern script. Notice [A] the Fire Command is set to Button Press and the [B] Command Key for this is set to the spacebar. Take a look at the different Fire Commands: Button Press, Button Press AutoHold, Automatic and Automatic AutoHold.
Change the Fire Command to Button Press AutoHold and once again enter play mode. Observe how when tapping or holding the spacebar the shot stream is held for a period of time determined by [C] the Auto Hold Duration value and can’t be re-triggered until after that time has passed.
Change the Fire Command type to Automatic and note how space bar no longer triggers the shot. Instead the [D] public Trigger Auto Fire toggle is responsible for triggering the shot.
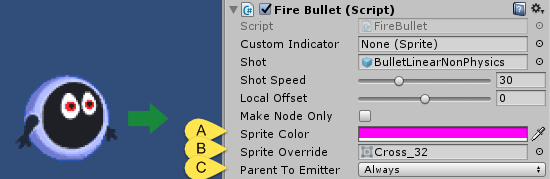
Returning once more to the child firing script at the Point, enter play mode and [A] click on the Sprite Color and set it to a magenta hue. Next go to [B] Sprite Override and load the greyscale version of Cross_32.
Fire some shots and notice how the emitter is able to override not only the sprite color but the main sprite for the shot instantiated.
Still in play mode, change the [C] Parent To Emitter value from “Never” to “Always.” Fire shots while pressing the arrow keys on the keyboard to move the Player and note how the shots follow the Player on the X/Y plane. If you want the shots to follow along with the player only when in the act of firing, change the value for Parent to Emitter to “While Shot Held.”
One final value worth mentioning that effects shot placement is Exit Point Offset of the parent Controller script and Local Offset of the child Point firing script.
If all of these values are set to zero, the shot is fired at the base of the emitter’s arrow point indicator. By changing Exit Point Offset you can offset this instantiation point for all emitters that the controller manages, while individual emitter offsets are controlled locally via Local Offset.
7.Changing Shot Types
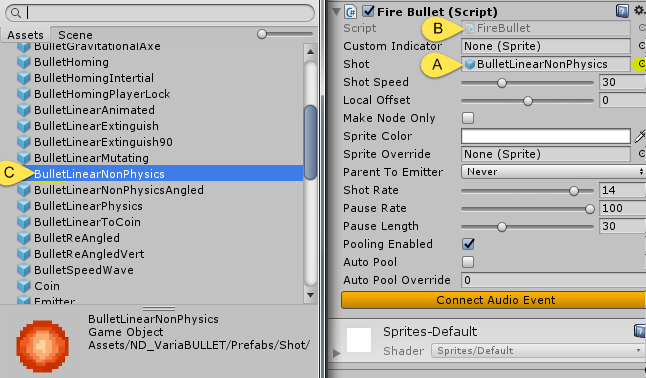
You can change the type of shot fired from an emitter by [A] replacing the existing one in the Shot field with another one found in the Assets > ND_VariaBULLET > Prefabs > Shot directory.
If you’re using a default [B] FireBullet firing script, then you have to be careful to load only a [C] Bullet (denoted with the prefix “Bullet”) whereas you can load a Laser type prefab (denoted with the prefix “Laser”) if your emitter uses a FireExpanding script.
To change the type of firing script your emitter uses, simply go to the Controller and select from the dropdown Default Emitter control either Bullet or Expanding.
When you create a new emitter by increasing the Emitter Amount slider it will then instantiate whichever type you selected here.
Note that previously created emitters are cached even if they are not in use, and those emitters will always retain whatever emitter type they were given when they were created. To re-write these emitters you will have to remove them.
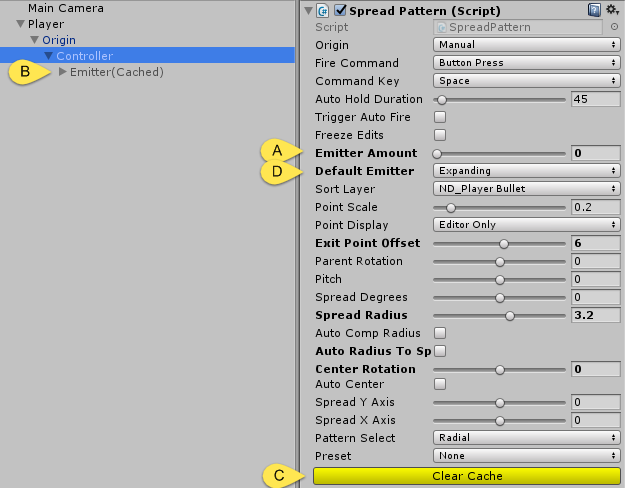
To demonstrate this in action, [A] reduce the Emitter Amount slider down to 0 which will [B] cache all existing emitters and then [C] click the Clear Cache button to remove the cached emitter.
Now with the first emitter cleared, change the [D] Default Emitter to Expanding and add a new emitter by increasing the Emitter Amount slider back to 1.
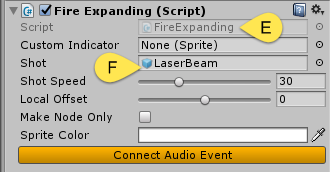
Go to the firing script attached to this emitter’s point and notice you have a [E] FireExpanding type emitter with a default [F] LaserBeam loaded as the Shot type.
Also note that a Laser’s FireExpanding script has fewer options than that of a Bullet’s FireBullet script. In all other respects it will operate in much the same way.
Go to next: In Depth Controller Guide ⟾