⬑ Go to: Main
⟽ Go to previous: Quick Start Guide
Go to next: In Depth Shot Guide ⟾

1.Cloning Emitters
When setting up firing characteristics for an emitter it’s often common to want to replicate those settings across the other emitters handled by the same controller. VariaBULLET2D has an easy way to do this using a cloning procedure.
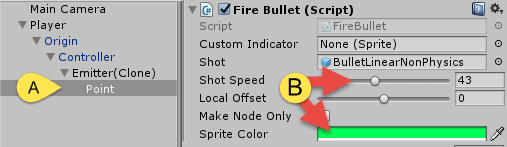
To demonstrate, change the default values in the [A] first emitter (the one directly under the Controller in the hierachy), [B] setting Shot Speed to 43 and making the Sprite Color lime green.
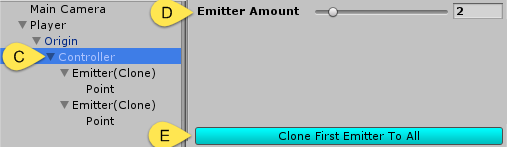
And [C] back in the controller increase the [D] Emitter Amount to add more emitters to the controller. Then [E] click on the Clone First Emitter To All button and you will find that all emitters now have the same values as the first emitter, though they can be further edited individually to differentiate if required.
2.Custom Point Indicators
Each emitter Point has a green arrow indicator by default. These indicators are generally useful when creating patterns in edit mode, however there are some cases where they are useful during play mode as well.
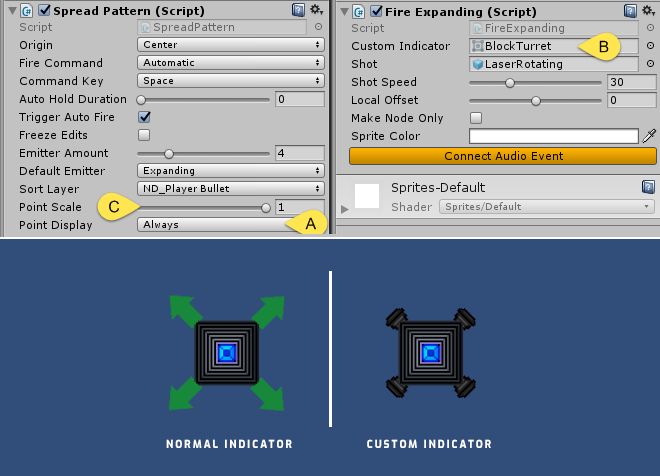
First, to make the indicator visible in play mode, [A] change the visibility from “Editor Only” to “Always” for the Point Display dropdown in the controller’s SpreadPattern script.
Next, go to an emitter’s attached firing script and [B] change the default indicator by loading a different image into the Custom Indicator slot. Here we changed it to the “BlockTurret” image in the demo directory and cloned these changes to the other three emitters.
If the indicator needs to be scaled, you can [C] adjust this with the Point Scale control. Here we set the indicator to it’s unscaled normal size of 1.
Using a custom indicator in this way while adjusting the values during play mode can create a natural looking, dynamic animation in-game.
3.Directional Orientation
VariaBULLET2D’s default assumption is that the Controller is attached to a parent gameobject that’s oriented on a horizontal plane and facing to the right. Of course this is only one of several possible scenarios.
There are numerous ways to accommodate these different scenarios, but perhaps the easiest way to change orientation is by using the SpreadPattern‘s Parent Rotation control. In this case, if you want the controller’s top-most parent object (and its sprite) to orient vertically (pointing towards the top of the screen), simple change Parent Rotation to 90. If you want it to point vertically downwards then set it to -90.
Of course you can use Parent Rotation to simply change the rotation of the entire pattern, but it’s generally better to use the Center Rotation control to achieve this when you don’t want to change the visual orientation of the parent object/sprite.
Meanwhile, the best way to handle horizontal/vertical flipping is by changing the scaling of the top-most parent’s localScale.x or localScale.y to either 1 or -1.
4.Nodes & Child Emitters
There’s one particular case in which Parent Rotation cannot be set, and that is when the Origin‘s parent happens to be another emitter point which is under control by its own controller. Parenting a controller to an emitter point is as simple as it sounds. Simply [A] drag a new controller onto the Point gameobject in the hierarchy.
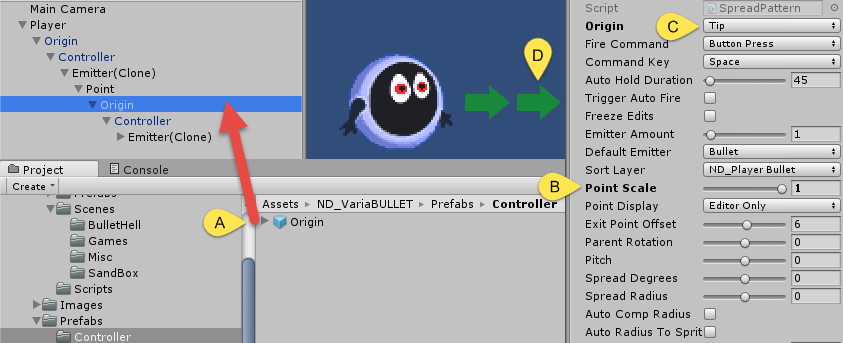
One of the first things you’ll notice when you do this is the child indicator will be scaled by the parent and appear too small. Simply [B] increase child indicator Point Scale to 1. However, now the child and parent points are over top of one another. The easiest way to separate them is to [C] set the child point to Origin to Tip, placing the [D] child emitter in front of the parent emitter.
Here we’ve created nested emitters. Both will fire and are independently controllable as you would expect. However the common usage would be to make the parent emitter point a node and simply use its controller to control its placement/motion, leaving the child emitter(s) to do the firing.
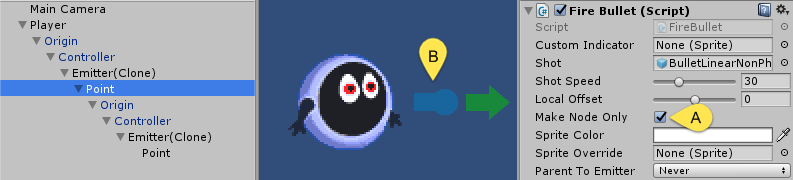
To change an emitter to a node, simply go to the emitter’s firing script and [A] select Make Node Only. By making an emitter into a node you are effectively bypassing its firing script, changing its [B] indicator in the process to a blue bulb-tipped indicator.
By combining nodes and emitters you can create tremendously flexible and complex structures that are individually controllable, moving and extending indefinitely in any direction.
Note: as of v1.03, you can trigger firing of nested controllers from a top-level controller by enabling “Master” for the top-level controller in the inspector.
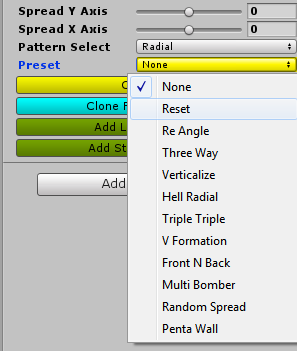
5.Presets
As you can see there are countless ways to create emission structures, from straight forward to extremely complex.
A few common scenarios are covered via default presets that you can access via the controller’s Preset dropdown menu. Take a look at some of these and make note of which values are responsible for the changes.
The “Reset” preset is particularly useful when things get messy and you need a quick reset back to the initial state.
6.Automators
At some point you will probably want to change controller values programmatically to create interesting in-game patterns, aiming behaviors and so forth. You can, of course, access any controller’s public values through a custom script and change them that way, however, an easier way is to attach an Automator script to the controller.
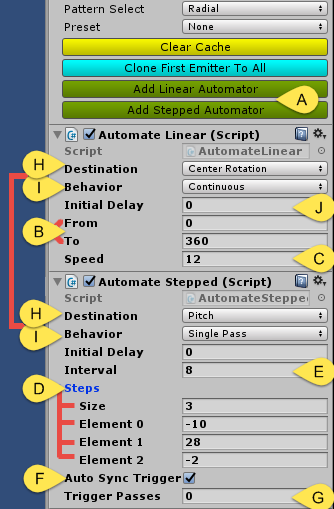
You can [A] click Add Linear Automator or Add Stepped Automator on any controller’s SpreadPattern script to attach an automator script to the controller. The main difference between stepped vs linear is a Linear Automator changes a control point in a linear manner [B] between two values (From and To) at the given [C] Speed, whereas a Stepped Automator can have any amount of [D] discrete Steps that go between values of your choosing at whatever [E] Interval you choose between each step.
A Stepped Automator is also capable of triggering the controller’s Trigger Auto Fire at each interval by [F] enabling Auto Sync Trigger making it particularly useful for setting up enemy patterns that go on for a determined amount of iterations set by [G] Trigger Passes (behavior will go on indefinitely if this is set to 0).
Note that you can also use a Stepped Automator just for triggering by setting a single step to a value that you don’t expect to change. This is particularly useful for triggering enemy attack patterns.
You can set the control point that an automator changes over time via the [H] Destination dropdown list. The [I] Behavior list, meanwhile, determines whether that behavior occurs once (Single Pass), back and forth indefinitely (Ping Pong), in a continuous loop indefinitely (Continuous), or randomly (Randomized).
There is a difference, however, in how a stepped vs linear automator handle a Continuous behavior. In Stepped, Continuous iterates over each step and ends up back at the beginning and going in this loop indefinitely whereas with Linear, the value changes continuously from the From value and moves indefinitely past the To value. This makes Linear more useful for continuous behaviors in a single direction or 360 degree rotation.
Also note that you can delay the initial execution of automators with the [J] Initial Delay field, which is particularly useful for delaying the first triggered firing or creating pattern stages.
7.Freezing Edits
Most of what we covered has to do with controllers that change state in one way or another. However there are many cases where – once your emission structures have been set to your liking – a controller state is meant to remain static (emitter formations won’t need to change).
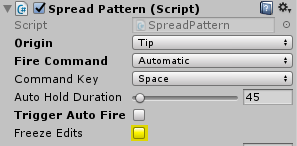
In these cases, you can enable Freeze Edits to make the controller more efficient while disabling any further editing on any of its control values.
Note that you will still be able to change controller values, however these value changes won’t be reflected until Freeze Edits is disabled. Also note that changes and accessibility to Fire Command, Command Key, Auto Hold Duration and Trigger Auto Fire are still reflected while Freeze Edits is enabled as they are necessary controls for firing shots.
⟽ Go to previous: Quick Start Guide
Go to next: In Depth Shot Guide ⟾