
⬑ Go to: Main
⟽ Go to previous: In Depth Controller Guide
Go to next: System Guide ⟾

1.Bullet Shots
The previous guides have mainly focused on setting up emitters via a controller, followed by instantiating shots via the firing script attached to the emitters. What we need to take a closer look at next is the actual Shot prefabs and, in particular, their attached shot scripts which determine their trajectory/behaviour once they’ve been instantiated.
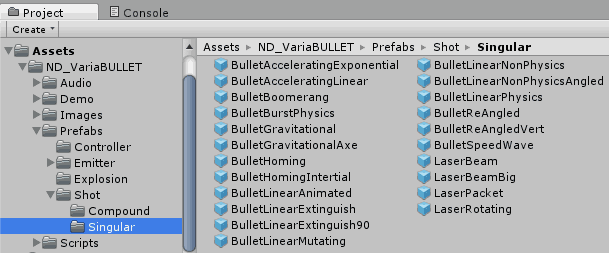
All default Shot prefabs are found in Assets > ND_VariaBullet > Prefabs > Shot
The prefabs in the Singular folder are single shot types whereas Compound are a bit more complex, using built-in events or even prefabs that themselves carry controllers/emitters. Some of these more complex Shot types will be covered in the Scripting guide.
The BulletLinearNonPhysics Shot prefab is probably the most commonly used prefab, so it’s a good place to start towards understanding Shot prefabs in general.
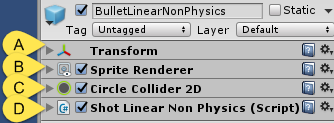
Looking closer at the prefab, take note of its common form: An [A] Transform, [B] SpriteRenderer, [C] Collider2D and [D] an attached Shot script. For the rest of this guide we’ll focus simply on the Shot script’s exposed fields visible in the inspector and leave the code behind these exposed fields for the Scripting guide.
Also for the time being, we’ll simply focus on the Shot script fields which impact the shot’s visible behavior.
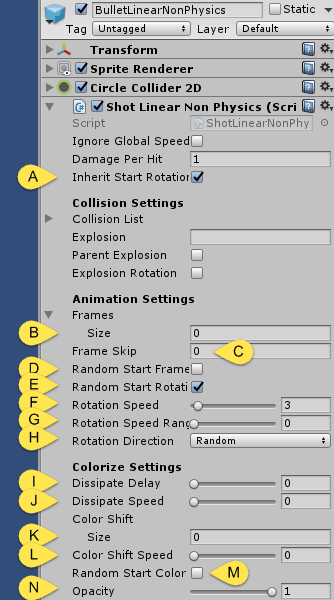
First we see [A] the Inherit Start Rotation field which simply takes on the rotational angle of the emitter at the point of instantiation when enabled. This is particularly useful if the shot type is angled rather than circular. Next we’ll turn to [B] the Frames field, which let’s you set up an indefinite amount of Sprite frames that the shot will iterate over in order to create a simple, looping animation. [C] Frame Skip will control the speed of this animation by skipping the number of frames set by this value. You can also randomize which frame represents the initial frame, with [D] Random Start Frame. This is useful for creating visual variation particularly in the case of having a lot of bullets on the screen at once.
[E] Random Start Rotation overrides the previously set Inherit Start Rotation while [F] Rotation Speed controls how fast the rotation will occur and [G] Rotation Speed Range varies that speed within the window set here (as an example, if Rotation Speed is set to 3 and Rotation Speed Range is set to 0.5 the actual rotation speed at instantiation will be randomly set anywhere between 2.5 and 3.5.)
The [H] Rotation Direction dropdown determines whether the shot rotates clockwise, counter-clockwise, randomly or directional (counter-clockwise if the shot is traveling to the left, clockwise if the shot is traveling to the right).
[I] Dissipate Delay sets a delay time after which point the shot begins to fade away at a rate determined by [J] Dissipate Speed (these controls are particularly useful when creating particle or fire FX). You can dynamically shift the color of the shot by setting a color array in [K] Color Shift, moving between colors at a rate set in [L] Color Shift Speed. If a color array is set, you can have a random start color by enabling [M] Random Start Color. The bullet’s starting opacity can also be set with [N] Opacity.
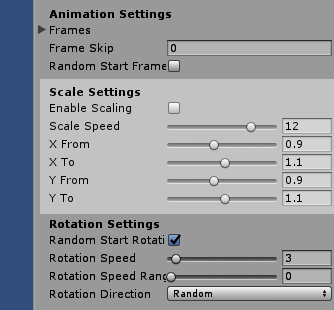
New in v1.06 is the option to scale bullets independently on the X/Y axis. This can create animation effects such as pulsing, growing/shrinking, or a dynamic propeller-like effect when combined with rotation. Note that when the bullet’s initial scale is greater or less than the “FromX/Y” value, it will first scale to the “FromX/Y” value and then continue the routine from there if there is a difference between the FromX/Y and ToX/Y values.
Collider Flux
Note: in v1.03 a new field was added to Bullet shot types called ColliderFlux. When enabled, it dynamically enables/disables the shot collider, resulting in a considerable performance gain. However, to work it will require a single static collision object source set in the StaticColl field in the GlobalShotManager. A common usage example would be to set StaticColl to the Player name/tag, resulting in enabling the (presumably enemy) shot collider only when within a radius of the Player set via StaticCollRadius in the GlobalShotManager.
Be sure to also set the shot’s physics layer in the Project Settings > Physics2D layer collision matrix to collide with only the StaticColl object’s layer (EG: if the shot is set to “ND_EnemyBullet” layer and the static object is set to “Player” layer, ensure that only these two layers collide with eachother in the matrix).
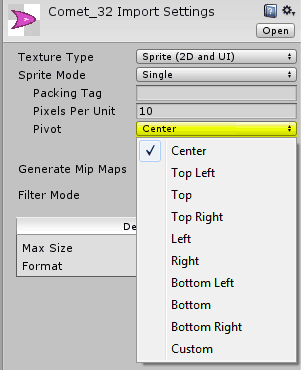
It’s worth remembering that a bullet’s rotation occurs relative to the pivot point in the sprite’s settings. The default pivot is set to the center of the image, however it might be useful to set it differently if you want the rotation to appear off-center.
2.Laser Shots
A Laser shot script has a somewhat different structure from that of a Bullet shot. In this section we’ll look at these differences, which are shared by all Laser Shots. The base type for these shots is the LaserBeam prefab, in Assets > ND_VariaBullet > Prefabs > Shot > Singular so we’ll look at that to better understand Laser Shots.
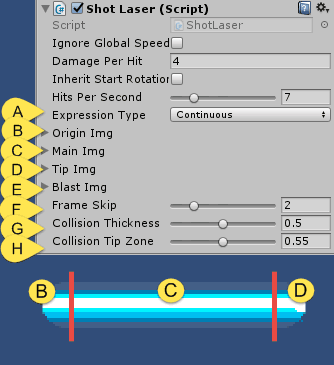
The [A] Expression Type dropdown determines whether the laser expands continuously from the emitter (Continuous) or if it releases from the emitter whenever the trigger stops firing (Packet), behaving somewhere in the middle between a laser and a bullet.
For animation frames, a Laser has 4 segments to consider: [B] Origin Img (initial exit section), [C] Main Img (main expanding section), [D] Tip Img (far tip section when not colliding) and [E] Blast Img (far tip section when colliding).
Each section can have an indefinite amount of frames, though it’s generally a good idea to have the same amount of frames for each.
As with bullet Shot prefabs, [F] Frame Skip determines the speed of the animation.
A laser detects collisions using a raycast. By default the thickness of the ray is the same as the thickness of the sprite used for the Main Img. You can decrease the thickness of the ray by setting [G] Collision Thickness accordingly. Similarly, you can determine the collision area at the tip of the laser by setting [H] Collision Tip Zone. This is generally useful for tweaking where a Blast section of the laser lands relative to the object it collides with.
Super Lasers (LaserMask)
New in V1.04 are “Super Lasers” which area a variant of the previous lasers that allow for highly dynamic looking mid-section animations. Whereas the previous laser types relied on stretching the mid section – which would cause distortion unless the image was completely rectangular – Super Lasers use a sprite masking technique which gradually reveals the portion of the mid section that occurs just before the tip of the laser.
In addition to this, the mid section animations can be staggered, resulting in the appearance of the previous animation frame moving into the next contiguous frame, allowing for an infinite progressive flowing appearance. Check out a short demo video that showcases some of what these new laser types can do:
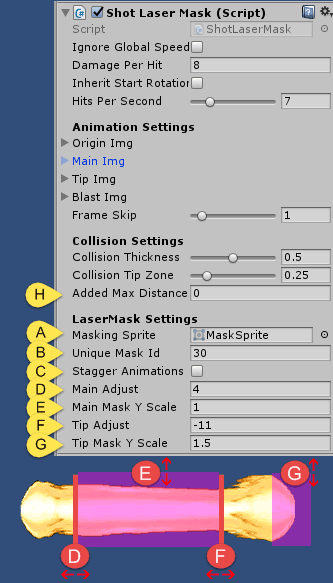
A Super Laser uses the ShotLaserMask script, which is derived from the common ShotLaserBase class, so it shares most attributes common to other lasers. The differences are mainly contained in the LaserMask Settings, starting with the [A]MaskingSprite image used for masking, [B]UniqueMaskId for de-conflicting with other Super Laser masks (be sure to set each Super Laser that may overlap with another to its own unique number).
[C]StaggerAnimations increments each successive start frame for the Main mid section “chunks”, allowing for seamless blending (EG: the end of the first chunk seamlessly tiles into the beginning of the next contiguous chunk, and so on).
[D]MainAdjust allows for adjusting the starting point of the entire mid-section while [E]MainMaskYScale adjusts the Y-axis scaling of the mask to ensure it covers the entirety of the mid-section sprites. [F]TipAdjust allows for adjusting the start of the tip section and [G]TipMaskYScale adjusts the Y-axis scaling of the mask on the area right in front of the tip to ensure coverage. The tip mask is used in a special case in order to mask the Origin and Main images if they happen to extend past the tip (as can be the case on point-blank collisions). New in v1.06 is the ChunkAdjust option to adjust the mid-section “chunks” to either overlap one another, or have have gaps in between.
New to all lasers is the option to extend the max distance the laser can reach with an [H]AddedMaxDistance override.
3.Default Shot Prefabs
Now that we’ve gone over the basics of the exposed fields common to each shot script, let’s quickly go over the most common default shot prefabs and what makes them – and their shot scripts – different from one another. All of these default prefabs can be found in Assets > ND_VariaBullet > Prefabs > Shot
BulletLinearNonPhysics (prefab) | ShotLinearNonPhysics (script):
The default shot type we already covered. The script moves the bullet in a linear manner by changing its transform position directly rather than with physics.

BulletAccelerating (prefab) | ShotAccelerating (script):
A non-physics Bullet that gradually accelerates. The acceleration rate is set by the Velocity Curve, either Linear (gradual) to Exponential (rapid). Accel Factor is the base rate of the acceleration while Speed Limit places a limit on how fast the bullet can accelerate before it maintains a constant speed.

BulletLinearAnimated (prefab) | ShotLinearNonPhysics (script):
The exact same type of shot as BulletLinearNonPhysics however Sprite animation frames have been added as a demonstration of the simple animation system used for most Shot types.

BulletSpeedWave (prefab) – ShotSpeedWave (script):
A non-physics type bullet which moves in a linear trajectory but varying in speed along that path, similar to a wave. The shape of the wave can be set by drawing in the Wave Form while Wave Accent can accentuate the peak effect. Cycles determines how many waves occur while Frequency determines how wide the wave effect appears (lower values for a stretched out wave effect, or higher values for a compressed effect). You can scale the effect relative to the speed of the shot with Scale To Speed.
BulletLinearPhysics (prefab) | ShotLinearPhysics (script):
Same as ShotLinearNonPhysics except that the script moves the bullet in a linear manner by directly changing its velocity via the physics engine. As with other physics-based shot types it comes with a Rigidbody2D component attached. When simple materials are applied a host of realistic physics attributes can be easily created such as bounce, deflection, drag and so forth.
BulletReAngled (prefab) | ShotReAngle (script):
A non-physics type of Bullet which follows a path with a single angle change at some point in its path. This angle change occurs at Re Angle Time while its degree is varied by Embellish. You can in turn automate the Embellish behavior with Auto Embellish and Auto Embellish Range. By default, re-angling occurs on a horizontal plane while a vertical re-angling can be set with selecting Vertical Orientation.

BulletHoming (prefab) | ShotHoming (script):
A non-physics type bullet which follows a target gameobject. You can set a single target using Target Direct (example: an enemy homing on player1), or from Target From Tag (example: homing on a group of gameobjects tagged “Enemy”). Rotation Type is set to Tracking by default, which changes the bullet’s rotation relative to its angle to the target, while Free switches to the default rotational behavior set by Rotation Speed. Speed of tracking rotation is determined by Track Rotation Speed. Homing Engage Time determines the time it takes after a bullet is fired to start looking for targets to home in on. Meanwhile, Engage Radius sets the area around the bullet where it looks for targets to track while ReCalculation FPS determines how often the bullet checks to see if another target is closer.

BulletHomingInertial (prefab) | ShotHomingInertial (script):
A physics based variant of ShotHoming. This bullet is inert until it receives a “Burst” command set at intervals determined by Burst Frequency. Initial Push is used to determine the first “Burst” upon being fired, from 0 being completely inert to any multiple of the speed it was fired at.
BulletGravitational (prefab) | ShotGravitational (script):
A physics based Bullet that uses a single point of force to propel the bullet along a parabolic arc. Best used for bullets that follow a realistic gravitational trajectory. You can increase the effect of gravity with Gravity Scale, shift the Center of Mass and rotate the object on that center point with Center Mass Pivot. The speed of this rotation is handled by Pivot Rotation Speed.
BulletBoomerang (prefab) | ShotBoomerang (script):
A non-physics bullet which boomerangs back to its original emission point. Return Speed acts as a multiplier of its outgoing speed when returning back while Return Limit sets the distance at which it returns back to its emitter. Return Limit Auto Scale scales the limit relative to the initial firing speed so that it maintains the same Return Limit distance from the emitter regardless of the speed it’s traveling at.

LaserBeam (prefab) | ShotLaser (script):
A non-bullet shot which is instantiated by a FireExpanding script.

LaserPacket (prefab) | ShotLaser (script):
A variation of a laser which detaches when firing stops and turns into a projectile.

⟽ Go to previous: In Depth Controller Guide
Go to next: System Guide ⟾