The previous guides have mainly focused on setting up emitters via a controller, followed by instantiating shots via the firing script attached to the emitters. What we need to take a closer look at next is the actual Shot prefabs and, in particular, their attached shot scripts which determine their trajectory/behaviour once they’ve been instantiated.
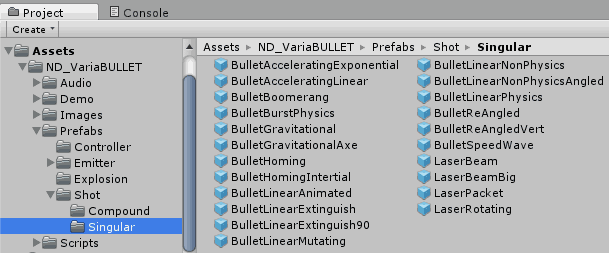
All default Shot prefabs are found in Assets > ND_VariaBullet > Prefabs > Shot
The prefabs in the Singular folder are single shot types whereas Compound are a bit more complex, using built-in events or even prefabs that themselves carry controllers/emitters. Some of these more complex Shot types will be covered in the Scripting guide.
The BulletLinearNonPhysics Shot prefab is probably the most commonly used prefab, so it’s a good place to start towards understanding Shot prefabs in general.
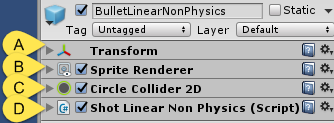
Looking closer at the prefab, take note of its common form: An [A] Transform, [B] SpriteRenderer, [C] Collider2D and [D] an attached Shot script. For the rest of this guide we’ll focus simply on the Shot script’s exposed fields visible in the inspector and leave the code behind these exposed fields for the Scripting guide.
Also for the time being, we’ll simply focus on the Shot script fields which impact the shot’s visible behavior.
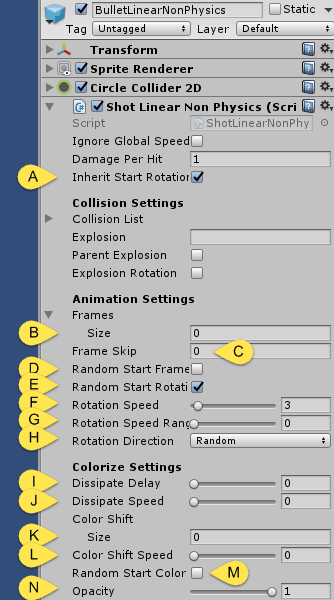
First we see [A] the Inherit Start Rotation field which simply takes on the rotational angle of the emitter at the point of instantiation when enabled. This is particularly useful if the shot type is angled rather than circular. Next we’ll turn to [B] the Frames field, which let’s you set up an indefinite amount of Sprite frames that the shot will iterate over in order to create a simple, looping animation. [C] Frame Skip will control the speed of this animation by skipping the number of frames set by this value. You can also randomize which frame represents the initial frame, with [D] Random Start Frame. This is useful for creating visual variation particularly in the case of having a lot of bullets on the screen at once.
[E] Random Start Rotation overrides the previously set Inherit Start Rotation while [F] Rotation Speed controls how fast the rotation will occur and [G] Rotation Speed Range varies that speed within the window set here (as an example, if Rotation Speed is set to 3 and Rotation Speed Range is set to 0.5 the actual rotation speed at instantiation will be randomly set anywhere between 2.5 and 3.5.)
The [H] Rotation Direction dropdown determines whether the shot rotates clockwise, counter-clockwise, randomly or directional (counter-clockwise if the shot is traveling to the left, clockwise if the shot is traveling to the right).
[I] Dissipate Delay sets a delay time after which point the shot begins to fade away at a rate determined by [J] Dissipate Speed (these controls are particularly useful when creating particle or fire FX). You can dynamically shift the color of the shot by setting a color array in [K] Color Shift, moving between colors at a rate set in [L] Color Shift Speed. If a color array is set, you can have a random start color by enabling [M] Random Start Color. The bullet’s starting opacity can also be set with [N] Opacity.
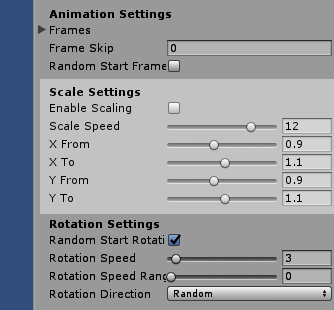
New in v1.06 is the option to scale bullets independently on the X/Y axis. This can create animation effects such as pulsing, growing/shrinking, or a dynamic propeller-like effect when combined with rotation. Note that when the bullet’s initial scale is greater or less than the “FromX/Y” value, it will first scale to the “FromX/Y” value and then continue the routine from there if there is a difference between the FromX/Y and ToX/Y values.
Collider Flux
Note: in v1.03 a new field was added to Bullet shot types called ColliderFlux. When enabled, it dynamically enables/disables the shot collider, resulting in a considerable performance gain. However, to work it will require a single static collision object source set in the StaticColl field in the GlobalShotManager. A common usage example would be to set StaticColl to the Player name/tag, resulting in enabling the (presumably enemy) shot collider only when within a radius of the Player set via StaticCollRadius in the GlobalShotManager.
Be sure to also set the shot’s physics layer in the Project Settings > Physics2D layer collision matrix to collide with only the StaticColl object’s layer (EG: if the shot is set to “ND_EnemyBullet” layer and the static object is set to “Player” layer, ensure that only these two layers collide with eachother in the matrix).
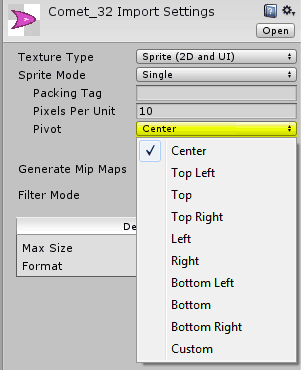
It’s worth remembering that a bullet’s rotation occurs relative to the pivot point in the sprite’s settings. The default pivot is set to the center of the image, however it might be useful to set it differently if you want the rotation to appear off-center.