A Laser shot script has a somewhat different structure from that of a Bullet shot. In this section we’ll look at these differences, which are shared by all Laser Shots. The base type for these shots is the LaserBeam prefab, in Assets > ND_VariaBullet > Prefabs > Shot > Singular so we’ll look at that to better understand Laser Shots.
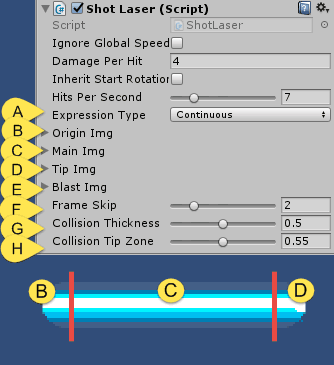
The [A] Expression Type dropdown determines whether the laser expands continuously from the emitter (Continuous) or if it releases from the emitter whenever the trigger stops firing (Packet), behaving somewhere in the middle between a laser and a bullet.
For animation frames, a Laser has 4 segments to consider: [B] Origin Img (initial exit section), [C] Main Img (main expanding section), [D] Tip Img (far tip section when not colliding) and [E] Blast Img (far tip section when colliding).
Each section can have an indefinite amount of frames, though it’s generally a good idea to have the same amount of frames for each.
As with bullet Shot prefabs, [F] Frame Skip determines the speed of the animation.
A laser detects collisions using a raycast. By default the thickness of the ray is the same as the thickness of the sprite used for the Main Img. You can decrease the thickness of the ray by setting [G] Collision Thickness accordingly. Similarly, you can determine the collision area at the tip of the laser by setting [H] Collision Tip Zone. This is generally useful for tweaking where a Blast section of the laser lands relative to the object it collides with.
Super Lasers (LaserMask)
New in V1.04 are “Super Lasers” which area a variant of the previous lasers that allow for highly dynamic looking mid-section animations. Whereas the previous laser types relied on stretching the mid section – which would cause distortion unless the image was completely rectangular – Super Lasers use a sprite masking technique which gradually reveals the portion of the mid section that occurs just before the tip of the laser.
In addition to this, the mid section animations can be staggered, resulting in the appearance of the previous animation frame moving into the next contiguous frame, allowing for an infinite progressive flowing appearance. Check out a short demo video that showcases some of what these new laser types can do:
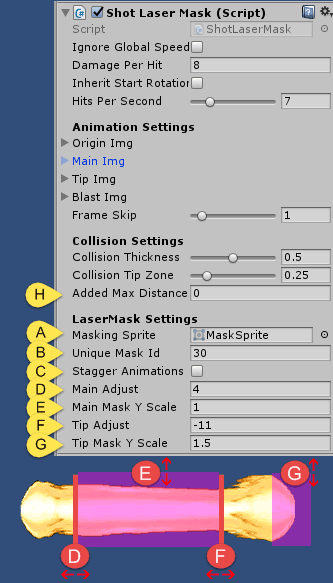
A Super Laser uses the ShotLaserMask script, which is derived from the common ShotLaserBase class, so it shares most attributes common to other lasers. The differences are mainly contained in the LaserMask Settings, starting with the [A]MaskingSprite image used for masking, [B]UniqueMaskId for de-conflicting with other Super Laser masks (be sure to set each Super Laser that may overlap with another to its own unique number).
[C]StaggerAnimations increments each successive start frame for the Main mid section “chunks”, allowing for seamless blending (EG: the end of the first chunk seamlessly tiles into the beginning of the next contiguous chunk, and so on).
[D]MainAdjust allows for adjusting the starting point of the entire mid-section while [E]MainMaskYScale adjusts the Y-axis scaling of the mask to ensure it covers the entirety of the mid-section sprites. [F]TipAdjust allows for adjusting the start of the tip section and [G]TipMaskYScale adjusts the Y-axis scaling of the mask on the area right in front of the tip to ensure coverage. The tip mask is used in a special case in order to mask the Origin and Main images if they happen to extend past the tip (as can be the case on point-blank collisions). New in v1.06 is the ChunkAdjust option to adjust the mid-section “chunks” to either overlap one another, or have have gaps in between.
New to all lasers is the option to extend the max distance the laser can reach with an [H]AddedMaxDistance override.