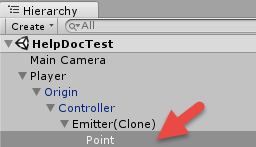
Once you have your emitters set up, the next thing you’ll want to establish is the shot characteristics for each emitter, such as speed, rate, shot type and so on. This is handled by the firing script attached to each Point gameobject set as a child gameobject to each Emitter.
The firing script for each child Point can be either a FireBullet script (for bullets) or FireExpanding script (for lasers). The default script for each emitter is FireBullet, which can fire any kind of Bullet shot prefab.
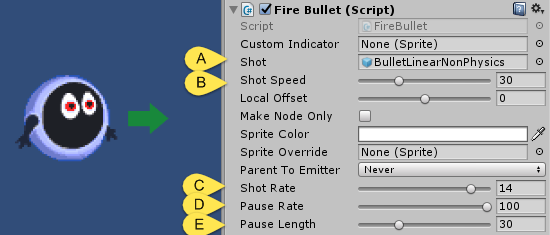
For now, just make note of the [A] default shot prefab called BulletLinearNonPhysics set in the Shot slot. Go ahead and press the play button to run the scene and press the spacebar to instantiate this shot from its emitter. Also note how the shot is different depending on whether spacebar is tapped or held.
While in play mode, change the [B] ShotSpeed from the default 30 to 60 and hold the spacebar to fire the shots. Note how the bullets increase in speed but are now spaced out farther from each other.
You can decrease the spacing internal by moving the [C] Shot Rate slider up to a low value. Set it to 4. Now press spacebar and note how the shots occur at at faster rate.
Turning now to the [D] Pause Rate, set it to 40 and press spacebar to observe a pause interval appear in the shot stream. Pause Rate sets how often the pause occurs, while Pause Length adjusts the length of time each pause lasts.
To create a shorter pause gap, move the [E] Pause Length slider down to 5. Make note of all of the values you’ve changed and exit play mode. You’ll notice that the values are reset to the state previous to enabling play mode. Play mode is therefore a good way to non-destructively experiment with creating shot patterns, but be sure to remember the values you settled upon so that you can input them once back in edit mode.
Actual triggering of the shot is the responsibility of the controller script, which notifies each of its Emitter’s firing scripts when to fire based on the command type chosen.
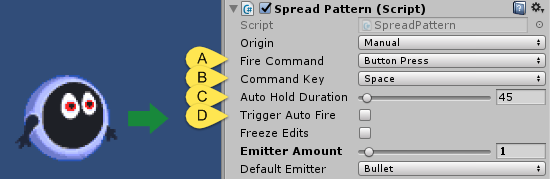
Turn back now to the Controller gameobject parent to this emitter and look at its attached SpreadPattern script. Notice [A] the Fire Command is set to Button Press and the [B] Command Key for this is set to the spacebar. Take a look at the different Fire Commands: Button Press, Button Press AutoHold, Automatic and Automatic AutoHold.
Change the Fire Command to Button Press AutoHold and once again enter play mode. Observe how when tapping or holding the spacebar the shot stream is held for a period of time determined by [C] the Auto Hold Duration value and can’t be re-triggered until after that time has passed.
Change the Fire Command type to Automatic and note how space bar no longer triggers the shot. Instead the [D] public Trigger Auto Fire toggle is responsible for triggering the shot.
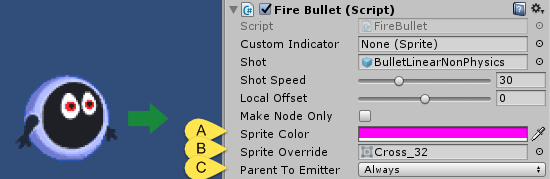
Returning once more to the child firing script at the Point, enter play mode and [A] click on the Sprite Color and set it to a magenta hue. Next go to [B] Sprite Override and load the greyscale version of Cross_32.
Fire some shots and notice how the emitter is able to override not only the sprite color but the main sprite for the shot instantiated.
Still in play mode, change the [C] Parent To Emitter value from “Never” to “Always.” Fire shots while pressing the arrow keys on the keyboard to move the Player and note how the shots follow the Player on the X/Y plane. If you want the shots to follow along with the player only when in the act of firing, change the value for Parent to Emitter to “While Shot Held.”
One final value worth mentioning that effects shot placement is Exit Point Offset of the parent Controller script and Local Offset of the child Point firing script.
If all of these values are set to zero, the shot is fired at the base of the emitter’s arrow point indicator. By changing Exit Point Offset you can offset this instantiation point for all emitters that the controller manages, while individual emitter offsets are controlled locally via Local Offset.