
⬑ Go to: Main
⟽ Go to previous: In Depth Shot Guide
Go to next: Scripting Guide ⟾

1.Intro
In previous guides we’ve looked at setting up emitters, instantiating shots and the shot behaviors. This functionality forms the heart of VariaBULLET2D, but there is a fair amount of added functionality from managing shot instantiation and object pooling, collision detection and creation of explosions, audio events, speed scaling and in-game preset management. Those are a few of the topics covered in this system guide.
2.Object Pooling
VariaBULLET2D offers a simple yet robust object pooling system which reuses – rather than destroys – Shot gameobjects that are no longer needed in the scene (such as after hitting an enemy or extending past the visible area on the screen). Reuse in this way can have a profound impact on performance, especially in cases where hundreds or even thousands of concurrent bullets appear on the screen.
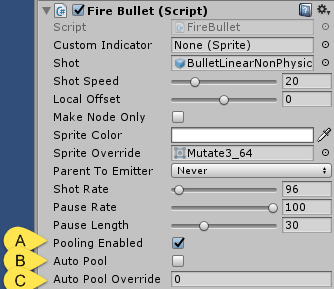
It’s extremely easy to make use of VariaBULLET2D’s built-in object pooling system. Since each object pool is controlled at the emitter level, simply go to each emitter’s attached firing script and [A] select Pooling Enabled.
Almost all existing bullet types can make use of the pooling system and you won’t have to think about it beyond setting this one toggle (Lasers and a few complex shots types in particular do not use pooling and ignore the emitter’s pooling setting).
By default, the pool of shots grows only when they’ve already been fired and are no longer needed in the scene. However, by [B] enabling Auto Pool you can have the system decide to start with a pool of shots when the FireBullet script first becomes instantiated. This creates a pool of objects immediately in order to reap the benefits of pooling from the very start.
In many cases, however, this isn’t worthwhile. It won’t make much sense, for example, to spawn an enemy with a pool of bullets if the enemy is not likely to stay alive long enough to need all of those bullets. On the other hand, if the enemy is a boss and is expected to need hundreds of bullets before it’s destroyed, then it may be useful to Auto Pool when the enemy is first instantiated.
You can choose to override whatever amount of bullets the system creates when auto pooling with Auto Pool Override. The Auto Pool setting tends to estimate on the conservative side, so if you run tests and find that you will likely need more bullets pooled at start, then you can easily count how many bullets end up pooled over a period of time and [C] input that total amount manually for Auto Pool Override. The default value of 0 does not change the Auto Pool amount at all.
Note: in v1.03 a “Banking Enabled” pooling option was added at the emitter-level firing scripts. Banked shots are managed via the GlobalShotBank whereas Pooled shots are managed via the emitter that fired the shot. The main difference is banked shots are not destroyed when the shot’s emitter is destroyed, and remain persistent as the scene progresses. Both options can be used simultaneously. Note that shots that have sprite overrides set by their firing scripts cannot be globally banked. For more banking options, including pre-loading shots, bank limits, etc, see the GlobalShotBank prefab in System > Resources > ND_VariaBULLET > GlobalManager
3.Shot Audio Event
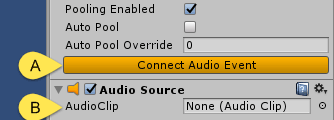
You have the option to attach an Audio Source to any emitter, which will trigger whatever audio clip you insert into the AudioClip slot. Simply [A] click the Connect Audio Event button on any emitter’s firing script and [B] load a clip. You can alter the shot volume and pitch and so forth while the firing script will automatically handle playing the clip when a shot is fired.
Note that it’s usually not worth adding more than one audio event to a group of emitters under a single controller unless the emitter patterns and shot types are very different from one another and you want to express this with an audio cue.
Also note that Lasers handle Audio clips differently from ordinary bullet shots. A Laser’s FireExpanding script actually plays the Audio Clip as a loop and requires a loop point embedded in the audio file or a precisely looped audio file with carefully edited beginning and end points.
4.GlobalShotManager
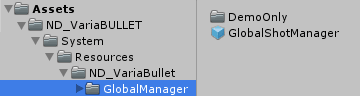
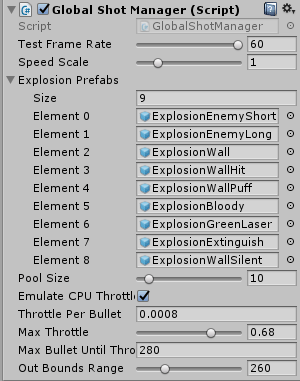
The GlobalShotManager prefab can be found in the Assets > ND_VariaBULLET > System > Resources > ND_VariaBullet > GlobalManager directory. It handles a variety of global settings covered below.
Note that the GlobalShotManager referenced by the included demo scenes is stored in the “DemoOnly” folder and comes with preset settings relevant to the demos.
4.1.Lazy vs Forced Instantiation
By default, the GlobalShotManager gameobject becomes instantiated (technically called a “Singleton”) when any Shot is first fired in the system. This is sometimes referred to as “lazy” instantiation.
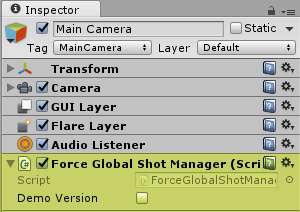
By contrast, you can force its instantiation at start of the scene by attaching the ForceGlobalShotManager script on any persistent GameObject in the scene (for this reason, usually best placed on the Camera gameobject).
It is recommended in production scenarios to force instantiation as otherwise it can introduce a performance hiccup when lazily instantiated.
Demo scenes use the demonstration version of the GlobalShotManager, which is set here via the Demo Version toggle.
We’ll refer to the demo version of the GlobalShotManager in the rest of this guide.
4.2.Test Frame Rate
Looking closer, we see that there is a target frame rate setting called Test Frame Rate in the GlobalShotManager script. This is the target framerate for your scene (typically 60FPS), while a setting of 0 represents an unlocked FPS.
It can be useful for testing to try lowering the FPS, thus ensuring the game runs framerate independent even if system specs were to drop.
4.3.Global Speed/Time Scale
The global Speed Scale setting, which is referenced by every shot in the scene, can dynamically speed up and slow down all shots on the screen while not affecting the overall speed that the game plays at. Alternatively, and new to v1.06, is Global Time Scale which can control the entire game speed (example: for creating “bullet time” slowdown effects, etc)
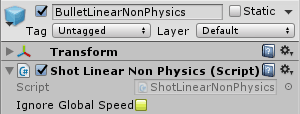
Note that individual shots can opt to ignore bullet speed scale by enabling Ignore Global Speed Scale at the Shot prefab level.
Note: as of v1.03 RateScale was added to the GlobalShotManager while IgnoreGlobalRateScale was added to FireBullet scripts. These new settings allow for dynamic control of all emitter firing rates from the GlobalShotManager in much the same way as the global SpeedScale. There is also a LockRateToSpeed toggle in the GlobalShotManager for keeping global RateScale in sync with global SpeedScale. When used in tandem, these settings can make for an effective “difficulty” slider, increasing or decreasing bullet pattern densities from within one simple setting.
4.4.Emulate CPU Throttle
There is also an option to Emulate CPU Throttling, which is an effect familiar to many retro shoot-em-up games in which the entire game engine slows down to accommodate hundreds or thousands of bullets on the screen at once.
Obviously we live in an era in which most modern systems – even SmartPhones – will likely be able to keep up with the demands of so many concurrent gameobjects. However, it is useful to not only enable better performance but also as a feature to produce this retro “Slowdown” effect most commonly seen in “BulletHell” titles.
To make use of this feature, simply enable Emulate CPU Throttle, set the amount of throttling each bullet adds to the engine with Throttle Per Bullet, the maximum amount of throttling before it no longer throttles with Max Throttle and the threshold at which throttling begins with Max Bullet Until Throttle.
It’s important to note that although slowdown may seem an unwanted side-effect, it is still preferable in 2D games to the jumpy frame effect (almost like frame-skipping) that most often happens if a low-performance system can’t keep up with demands and the the FPS drops. The only other way to achieve this smooth slowdown effect is to not use Time.deltaTime compensation in your code, however that would produce slowdown (if any at all) unpredictably depending on the capabilities of the platform the game is running on.
By contrast, VariaBULLET2D’s slowdown emulation is 100% user defined and predictable, which maintains the same type of predictive slowdown regardless of the underlying platform. As such its usage should be carefully considered as both a performance enhancement as well as gameplay tool.
4.5.Out of Bounds Range
The Out Bounds Range setting controlled at the global level is the point at which bullets traveling off screen become flagged as “out of bounds” and then become either re-pooled or destroyed.
The best range for performance would be at or near the very edge of the screen, in which case Out Bounds Range would be set to a value around 0.
However, because screens can sometimes move or patterns can exit the screen temporarily and then come back into the screen, you may want to experiment with increasing this value to strike a balance between peak performance and fluid gameplay.
4.6.On Screen Display

You’ll also notice that a GlobalShotManger has an OnScreenDisplay (OSD) script that contains helpful diagnostics in the upper left corner of the screen, showing Target FPS, Actual FPS, Active Bullets, SpeedScale and Throttling.
The OSD is worth keeping enabled for testing but is obviously best disabled in final builds.
5.Preset Switcher
Objects that fire shots in games often don’t fire the exact same pattern or shot; players switch weapons, bosses change their attack patterns and so on. VariaBULLET2D employs an easy and convenient way to store entire controller/emitter/shot states as a single preset and load them on the fly while in-game.

Simply [A] attach a FullPresetSwitch script to the gamebject parented to the controller’s Origin. Here you can [B] set the Button Switch, or Trigger Switch from outside code, resulting in the switching behavior.
Set [C] Preset Prefabs into the slots in the order that you want them to occur when switching. Optionally, you can enable loading the first prefab on Start with [D] Auto Switch On Start, and also you can set the [E] Delay Frames to create a buffer time between switches.
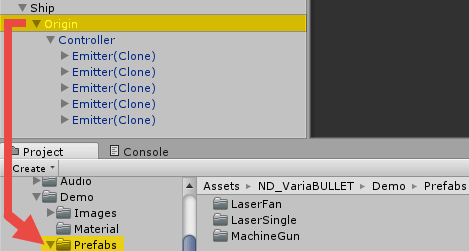
Creating a Preset Prefab is very easy. Simply set up the entire controller structure as you normally would and then drag and drop its Origin into a folder for later use. You can even create prefabs in this way when experimenting in play mode; great for producing new presets without messing up your settings in edit mode.
6.Collision System
VariaBULLET2D has a built-in collision system that uses Unity’s underlying collision setup. Since these settings are user defined and at the project level, there is a small amount of configuration required to ensure the required tags, layers and collision settings are set up properly.
Since care has to be taken when integrating VariaBULLET2D with existing projects, it is highly recommended that you first import VariaBULLET2D into a fresh new project. This will also make it much easier to setup the collision system and run the included demo scenes.
For setting up the system in a fresh project, refer to the Automatic Setup instructions below, while Manual Setup is for incorporating in existing projects.
6.1.Automatic Setup
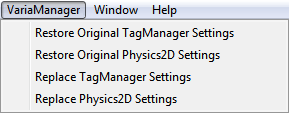
There is a simple method for ensuring the collisions and layers are setup when starting from a fresh project. After importing the VariaBULLET2D package, look to the menu and you should see the VariaManager menu option available to you with a list of procedures.
What these automated procedures do is safely backup the existing TagManager and Physics2D settings from your ProjectSettings folder and installs VariaBULLET2D’s. This will result in a layer structure and physics settings that you will find in the Manual Setup guide below.
All you need to do is select “Replace TagManager Settings” and “Replace Physics2D Settings” to run the necessary procedures. Once these procedures have completed, you should be able to run all demo scenes without issue. If there are issues, refer to the manual steps outlined below.
6.2.Manual Setup
While the Automatic Setup detailed above is best used for setting up the layer collision system in fresh projects, it likely won’t completely suffice when integrating VariaBULLET2D with your existing projects. For that scenario, refer to the steps outlined below.
When incorporating VariaBULLET2D with your existing project you will have to add the reserved layers that VariaBULLET2D references in order to manage shot collisions.
Below are the Sorting Layers, Physics Layers, Layer Collision Matrix and Tag settings needed for collisions in VariaBULLET2D. You can access these settings via the menu options Edit > Project Settings > Tags and Layers and Edit > Project Settings > Physics2D respectively.
VariaBULLET2D Sorting Layers
Sorting Layers determine which objects appear behind or in front of others. Existing projects refer to the underlying order, so changing this order can break existing project references. If possible, it’s best to insert these after your existing Sorting Layer references.

VariaBULLET2D Physics Layers
Physics Layers are a way for the collision system to determine which objects interact with others. Note that these layers mirror exactly the sorting layers (more on this below). Changing the layer order can result in changes to your background collision matrix shown below. If possible take a screenshot of your existing collision matrix before adding these layers to your project.

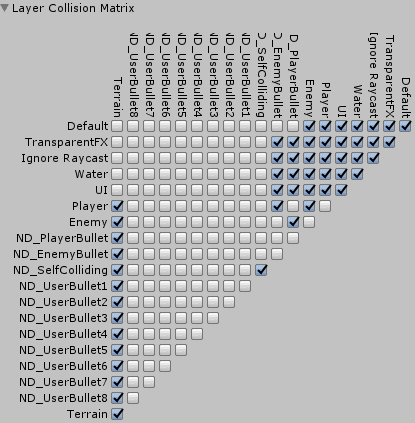
VariaBULLET2D Layer Collision Matrix
Layer Collision Matrix settings use the layers set above in order to determine collisions. Here are the collision objects that VariaBULLET2D looks to manage. Note that the eight UserBullet collisions are not determined. These are up to you to determine for any special case scenarios that might arise.
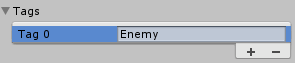
VariaBULLET2D Tags
Tags are used for a variety of scenarios in which an object type can be easily set and identified elsewhere in code. The homing scripts in particular use tagged gameobjects in order to work, and the included demo scenes using Homing Shots will reference these tags below.
6.3.How It Works
VariaBULLET2D handles collisions through the reserved layers, their interactions via the collision matrix and scripts that contain OnCollisionEnter2D and OnLaserCollision event methods.
Collision detection in return determines the destruction of bullets (or repooling), applying damage to objects that are hit, and handling audio/visual cue such as instantiating explosions and flickering damageable objects.
This section of the guide is meant to better explain how this all connects to form a single system.
Sorting
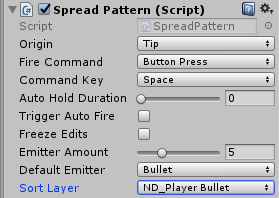
Shots inherit their sprite sorting layer though their emitter sorting layers, while emitters receive this layer info through the controller via the dropdown Sort Layer selection.
Recalling that Unity uses a reverse layering system (layers on top actually appear behind layers below them), you’ll note that an ND_PlayerBullet appears under ND_EnemyBullet and so forth.
Sorting Order
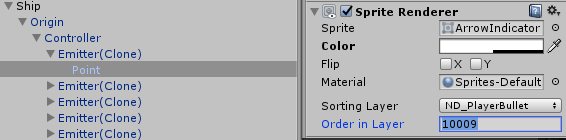
Further sorting within the layer is determined automatically (typically in order of emitter creation). However sorting order can be changed at the emitter level by changing Order in Layer of the Sprite Renderer directly.
Physics
Shot bullets assign their Physics Layer to the same name as their Sorting Layer and these collisions are managed in the Layer Collision Matrix previously described.
Collision Events
If a shot collision is detected by the underlying matrix (whenever it intersects with an Enemy or Terrain, etc) it fires the OnCollisionEnter2D (in case of a bullet collision) or OnLaserCollision (in case of a laser collision) event methods that are defined in the collision script attached to the object it collided with. Bullets also carry their own OnCollisionEnter2D event method in their attached Shots scripts that fire upon collision.
For a bullet, the OnCollisionEnter2D method in its Shot script (via the ShotBase class) destroys, or repools, the bullet and (via the ShotBullet class) instantiates an explosion particular to that bullet.
For the object that a bullet collides with, the OnCollisionEnter2D/OnLaserCollisions method in its attached ShotCollision script instantiates explosions particular to those objects (more on explosions in the next section).
Shot Collision Damage Script
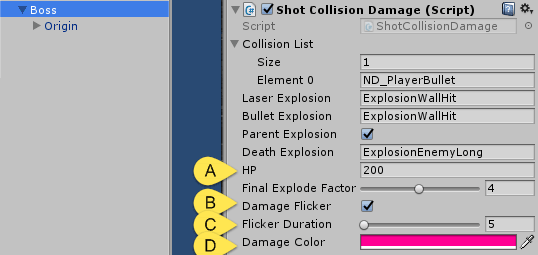
In the case of a ShotCollisionDamage script (usually attached to player/enemy/destroyable objects), the script also deals damage by decrementing [A] HP. The script also flickers the object to show damage via [B] Damage Flicker, [C] Flicker Duration and [D] Damage Color and destroys it if HP reaches 0.
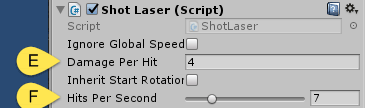
The amount of HP damage a shot creates is set by the incoming shot script’s [E] Damage Per Hit and, in the case of Laser shots, [F] Hits Per Second.
6.4.Explosions
It was already mentioned above how the OnCollisionEnter2D and OnLaserCollision events instantiate explosions; either – in the case of a bullet – its own explosion and/or the receiving object’s explosion. This section goes over how that is all handled.
When a bullet’s shot script detects a collision, it’s OnCollisionEnter2D method is raised via the ShotBullet class as well as the base class ShotBase. The ShotBase method simply determines if a bullet is destroyed or repooled, whereas the ShotBullet method determines if an explosion is requested.
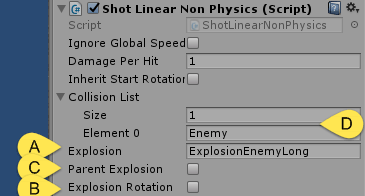
The type of explosion requested (if any) is set by [A] the shot script’s Explosion field. Here you enter the explosion’s name (more on this in a moment). You can also set whether or not the explosion’s rotation follows the bullet’s trajectory with [B] Explosion Rotation and whether or not it becomes parented to the object it is colliding with via [C] Parent Explosion.
Also, because you may not want all collisions to result in an explosion, you can filter and accept only the collision layers that result in an explosion via [D] Collision List.
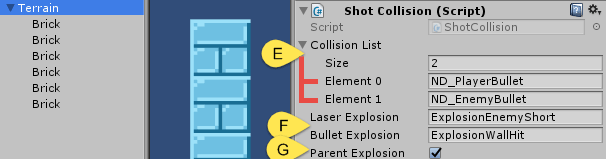
Meanwhile, a ShotCollision/ShotCollisionDamage script operates in much the same way and can create its own collision explosions by filtering which kind of shot results in an explosion through its [E] Collision List and even set different types of explosions depending on if the incoming shot was a Laser or a Bullet via [F] Laser Explosion and Bullet Explosion.
Enabling [G] Parent Explosion is best used in cases where the object receiving the collision is moving (such as an enemy, player, etc).

The default Explosion prefabs themselves are stored in Assets > ND_VariaBULLET > Prefabs > Explosions
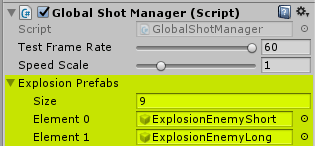
Explosion requests are called via the collision event methods mentioned above and sent to the GlobalShotManager, and so you must load the explosion prefabs into the GlobalShotManager in the resources folder ahead of time to fulfill those requests.
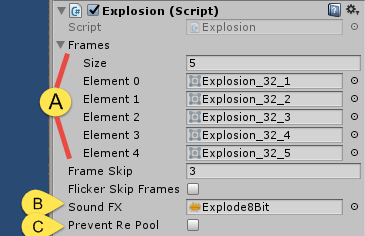
Explosion prefabs takes on the familiar structure of [A] holding animation Frames and Frame Skip. It also carries it’s own [B] Sound FX clip which the GlobalShotManager plays and you can prevent the GlobalShotManager from repooling the explosions via [C] Prevent RePool.
6.5.Troubleshooting
As we have seen, collisions are an interplay of a lot of moving parts, from project settings, to inspector settings, script events and their fields. When something in this system doesn’t work, it usually fails silently leaving you to consider what wasn’t set up correctly. The following is a general checklist against these common points of failure.
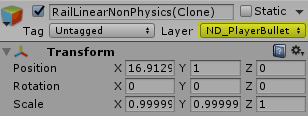
- Layers – Set objects to their correct layers. Remember, shot layers are determined by the emitter that fires them, and set in the emitter’s controller under “Sort Layer”. Meanwhile, objects that shots collide with are set by their physics layer in the inspector (upper right, above the transform component).
- Layer Matrix – Make sure layers actually interact in the Layer Collision Matrix in the menu section Project Settings > Physics2D
- Colliders / Rigidbody2D – Make sure that, both, the shot prefabs and the objects being collided with have 2D colliders. The object that collides with a bullet (the player, enemy, terrain, etc) should also have a RigidBody2D component that is properly set up.
- Script Collision List – Set the Collision List in the Shot script or the ShotCollision/ShotCollisionDamage scripts to filter which layer produces explosions. EG: Terrain layer objects typically accepts ND_PlayerBullet and ND_EnemyBullet layer objects. Player layer objects typically accept ND_EnemyBullet layer objects, etc.
- Explosion Name – Correctly name the explosion prefab string that is requested by these scripts. Double check by going to the GlobalShotManager and finding the correct name there.
- Explosion Prefab – Make sure your GlobalShotManager actually has the prefab explosion set in its Explosions Prefabs list. While you’re there, also be sure you’re using the right GlobalShotManager. If you’ve placed a ForceGlobalShotManager script on your camera, you can set it as the demo version (found in the Resources > GlobalShotManager > DemoVersion folder) or your own custom one in the root folder.
⟽ Go to previous: In Depth Shot Guide
Go to next: Scripting Guide ⟾