While the Automatic Setup detailed above is best used for setting up the layer collision system in fresh projects, it likely won’t completely suffice when integrating VariaBULLET2D with your existing projects. For that scenario, refer to the steps outlined below.
When incorporating VariaBULLET2D with your existing project you will have to add the reserved layers that VariaBULLET2D references in order to manage shot collisions.
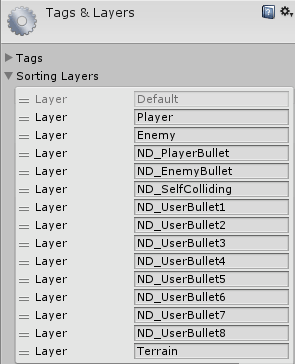
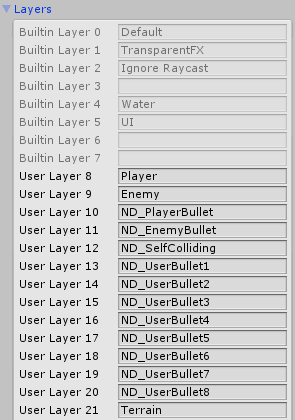
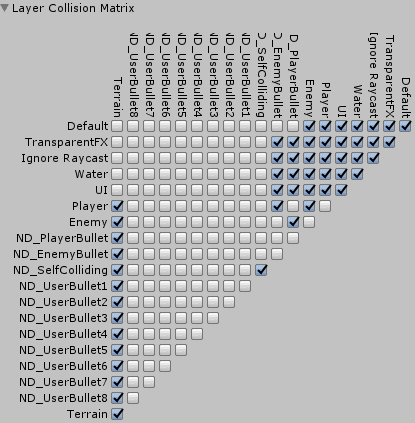
Below are the Sorting Layers, Physics Layers, Layer Collision Matrix and Tag settings needed for collisions in VariaBULLET2D. You can access these settings via the menu options Edit > Project Settings > Tags and Layers and Edit > Project Settings > Physics2D respectively.
VariaBULLET2D Sorting Layers
Sorting Layers determine which objects appear behind or in front of others. Existing projects refer to the underlying order, so changing this order can break existing project references. If possible, it’s best to insert these after your existing Sorting Layer references.

VariaBULLET2D Physics Layers
Physics Layers are a way for the collision system to determine which objects interact with others. Note that these layers mirror exactly the sorting layers (more on this below). Changing the layer order can result in changes to your background collision matrix shown below. If possible take a screenshot of your existing collision matrix before adding these layers to your project.

VariaBULLET2D Layer Collision Matrix
Layer Collision Matrix settings use the layers set above in order to determine collisions. Here are the collision objects that VariaBULLET2D looks to manage. Note that the eight UserBullet collisions are not determined. These are up to you to determine for any special case scenarios that might arise.

VariaBULLET2D Tags
Tags are used for a variety of scenarios in which an object type can be easily set and identified elsewhere in code. The homing scripts in particular use tagged gameobjects in order to work, and the included demo scenes using Homing Shots will reference these tags below.

